
nl:x300:veiligheidsinstructies
This is an old revision of the document!
Table of Contents
Algemene Inleiding - Veiligheidsinstructies
Inleiding
- Persoonlijke veiligheid is buitengewoon belangrijk bij het gebruik van gelijk welke machine, en het gebruik van de X-300 vormt daarop geen uitzondering. Lees dit deel over veiligheid aandachtig! Zorg ervoor dat je in alle omstandigheden weet hoe te reageren! Maak jezelf vertrouwd met die functies die je wilt gebruiken! Als je nieuwe functies voor de eerste keer wilt gebruiken, zorg er dan voor dat je de desbetreffende delen van deze handleiding leest en begrijpt.
- Bewaar deze handleiding op een veilige plaats of zorg dat hij altijd via het www kan geraadpleegd worden. Maak een shortcut op het bureaublad van je pc. Zorg ervoor dat hij altijd snel bereikbaar is om hem te raadplegen.
- Noch Ketele N.V. noch hun dealer of vertegenwoordiger dragen enige verantwoordelijkheid voor beschadiging of verlies, direct of indirect, die het gevolg zouden zijn van het gebruik van dit product, of het rechtstreeks of onrechtstreeks gevolg van een technisch of ander probleem met het product. Noch Ketele N.V. noch hun dealer of vertegenwoordiger dragen enige verantwoordelijkheid voor rechtstreeks of onrechtstreeks verlies of schade, veroorzaakt door een artikel of een voorwerp dat met deze machine gemaakt werd.
Veiligheidssymbolen in deze handleiding
Lijst met veiligheidssymbolen
• Gele driehoekige symbolen met een zwarte rand duiden belangrijke instructies aan, verwittigingen of potentieel gevaar.
 | De operator moet extra aandacht besteden aan de beschreven situatie. |
 | Electrisch gevaar. |
 | Lichamelijk gevaar, een hand of een vinger kan geklemd raken tussen bewegende machine-delen. |
 | Lichamelijk gevaar, een hand of een vinger zou gekwetst kunnen raken. |
 | Gevaar voor voorwerp met hoge temperatuur. |
• Blauwe cirkelvormige symbolen geven een belangrijke instructie aan, of een onderwerp dat extra aandacht vergt van de gebruiker.
 | De informatie in deze paragraaf bevat een nuttige tip of een suggestie. |
 | In de beschreven situatie is het noodzakelijk oorbescherming te dragen. |
 | In de beschreven situatie is het noodzakelijk om de machine los te koppelen van het muur stopcontact. |
 | Een aardverbinding die beantwoordt aan de beschreven karakteristieken is noodzakelijk. |
• Rode cirkels met een rode diagonale streep zijn verbodssymbolen.
 | Dit symbool geeft een verboden actie of een verboden situatie aan. |
 | Een algemeen verbod om de machine te de-assembleren of om de afschermkappen te openen. |
 | Verbod om de machine in een vochtige of een natte ruimte te plaatsen. |
 | Maak geen vuur in de nabijheid van de machine. |
•  OK symbool
Algemene veiligheidsinstructies
| Volg de bedieningsprocedure exact zoals ze beschreven is in deze handleiding. Alleen gekwalificeerde mensen die de volledige handleiding gelezen en begrepen hebben, mogen de machine gebruiken. Onoordeelkundig of onjuist gebruik van deze machine kan leiden tot kwetsuren. |
| Gebruik deze machine alleen in optimale omstandigheden. Zorg dat er voldoende plaats beschikbaar is, plaats ze op een vlakke, stabiele tafel of werkblad en zorg ervoor dat de volledige omgeving proper en voldoende verlicht is. |
| Wanneer je de machine wilt reinigen, of wanneer ze verschillende dagen niet gebruikt zal worden, of als de beschermkap of afdekkappen verwijderd moeten worden, trek dan eerst de stekker uit het stopcontact. |
| Gebruik de machine nooit als je onder invloed bent van alcohol, drugs of medicatie. |
| Gebruik deze machine nooit voor een ander doel dan waarvoor ze bestemd is. Probeer nooit de mogelijkheden van de machine te overtreffen. |
| Zorg ervoor dat de machine altijd stroom krijgt van een stopcontact met een goede aardverbinding. Als je niet zeker bent, laat dan een gekwalificeerde electricien de weerstand van je aardverbinding meten. |
| Bewaar je frezen in de daartoe bestemde freesstand. Daardoor worden kwetsuren vermeden door frezen die anders zouden rondslingeren. |
| Gebruik enkel originele Cyborg onderdelen en accessoires zoals frezen, spanknoppen, voedingskabels, tandriemen, limietschakelaars, etc. Het gebruik van niet door Ketele NV goedgekeurde onderdelen kan leiden tot schade, brand, of persoonlijke kwetsuren. |
| Op plaatsen waar je dit pictogram ziet verwijder je je handen wanneer de machine in automatische mode werkt. |
| Wees altijd voorzichtig met graveerfrezen! Ze kunnen buitengewoon scherp zijn en snijden heel gemakkelijk in je vingers. |
| Draag geen halskettingen, sjaals of andere loshangende kledingsstukken of juwelen wanneer je met deze machine werkt. Als je lang haar hebt, bind het dan vast in een paardenstaart. |
| Kinderen mogen deze machine nooit gebruiken. Zorg ervoor dat deze machine, maar ook de gereedschappen en accessoiresMake buiten hun bereik blijfven. Sommige onderdelen en accessoires zouden hen kunnen kwetsen of brandwonden veroorzaken. |
| Never place or operate the machine in a wet or humid environment. Failing to respect this prohibition, may result in personal injuries, severe electrical shocks, and damage to the machine and its electronics. |
| Never try to modify, disassemble or repair a machine, unless you are a qualified and trained technician. Unqualified people trying to modify, disassemble or repair this machine, may get injured, or get severe electrical shocks. |
| Do not lean, sit or lie on this machine. Not only could this lead to injuries, but also different machine parts might get damaged. Do never pose any load on this machine. |
| Never use dull cutters. They may result in the creation of excessive heat, which in turn, might lead to fire in specific materials. |
| Although the noise level of this machine is relatively low, users with sensitive ears or with damaged ear-drums are advised to wear ear protection. |
| Do not operate this machine in the neighbourhood of open fire. Engraving powder, chips, some plastics, woods and even some metals may catch fire. |
| To remove the dust and the engraving chips which were not removed by the vacuum boot, always use a vacuum cleaner, never use compressed air. To get rid of dust in narrow spaces, use a small soft brush, such as a toothbrush. |
| Every Cyborg X-300 is equipped with a dust removal boot on the depth regulator nose assembly. Always use a vacuum cleaner to remove the engraving dust and chips. Make sure this vacuum cleaner is explosion free. |
| Never try to cut or engrave flammable materials, such as magnesium. |
| Before launching a cutting or an engraving job, always make sure your material and the cutter are securely fastened, and that no tools or accessories are lying around in the zone of the automatic machine moves. |
| Warning, some parts of the machine may become very hot, among which the cutters, the spindle, the spindle motor and the stepper motors. |
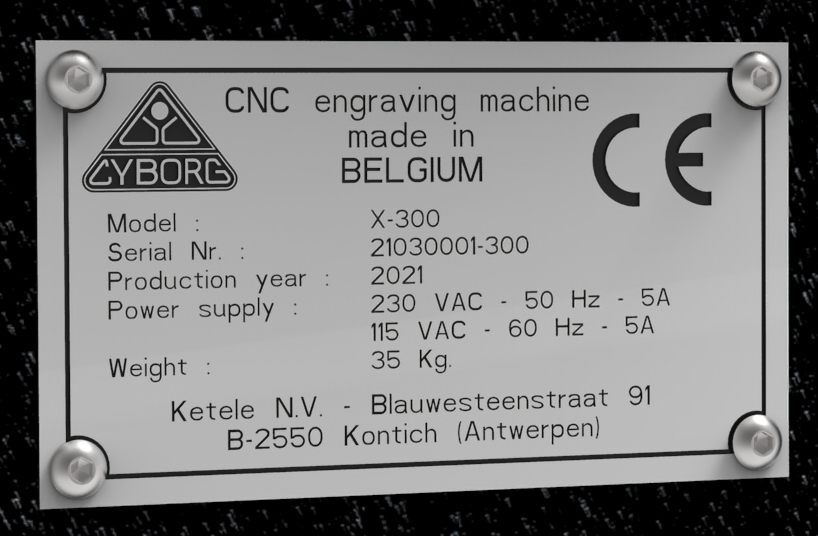
| Make sure that you connect the machine to an electrical outlet which corresponds with the machine rating. These ratings can be found on the machine plate on the right side of the machine (see the image on the right and below)! Before powering the machine, make sure that it has been set up correctly for the incoming voltage! You can find information about changing this setting in the chapter about the Installation environment. |
| If the power cord which is supplied with the machine is too short to reach the power outlet, and you need to use an extension cord, make sure you use one which is adequate for the machine’s rating (voltage, frequency, current). When using a cable reel, make sure to completely unwind the cable from the reel. Be careful as excessive cable lengths may cause the cable to heat. |
| In case you see, smell or hear sparks, smoke, a burning odour, abnormal or unusual sounds, you must immediately unplug the power cord. Do not attempt to continue using the machine without having it checked by an authorised technician. |
| Never use cutting oil or any other fluid to engrave or cut, without taking proper precautions to prevent the fluid from entering the electronics cabinet! Although the electronics are well protected, they are not completely isolated and fluids could enter the electronics cabinet. |
Machine Label
At the right side of the machine you will notice an identification label indicating the CE-conformity, the machine type and serial number and the power supply specs. The image hereunder shows where the machine label is positioned.

Continue to the technical specs.
Continue to the table of contents.
nl/x300/veiligheidsinstructies.1669202663.txt.gz · Last modified: 2022/11/23 12:24 by erik.ketele


