
This is an old revision of the document!
Table of Contents
Réglage d'une fraise
Comment utiliser le dispositif de calibrage des outils
 | * Pivotez l’anneau avec graduations jusqu’à ce que environ 3 à 4 tours de fil sont encore visible au dessus de cet anneau. |
 | * Placez une plaquette en métal quelque part sur le Multimat sur la table de gravure et bougez la broche au dessus de celle-ci. |
 | * Bougez la broche vers le bas jusqu’à ce qu’elle touche la plaque métallique. |
 | * Placez un bouton de serrage dans la broche et tournez-le dans le sens antihoraire pour le fixer. |
 | * Poussez gentiment une fraise à travers le bouton de serrage jusqu’à ce que le bout de la fraise touche la plaquette métallique. |
 | * Utilisez une clé inbus de 2mm pour sécuriser le bouton de serrage sur la fraise. |
 | * Dévissez ce bouton et la fraise de la broche (il faut tourner dans le sens horaire pour dévisser). |
 | * Sur le dispositif de réglage baissez la vis avec la grande tête complètement mais ne la bloquez pas. |
 | * Insérez la fraise avec le bouton de serrage dans le dispositif. |
 | * Vissez dans le sens antihoraire pour bien le fixer (à la main, n’utilisez pas de pince. |
 | * Tournez gentiment la vis à la grande tête vers le haut. Cette tête doit toucher le bout de la fraise. |
 | * Utilisez l’écrou de verrouillage pour fixer cette vis dans cette position. |
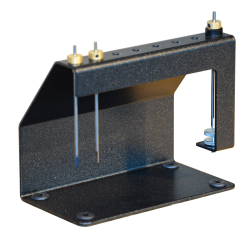 | * Vous pouvez maintenant prérégler tous vos fraises dans le dispositif. Quand il faut changer une fraise dans la machine, la profondeur de gravure sera automatiquement la même. |
Installing an engraving tool
After having calibrated your tools in the optional tool calibration stand, installing an engraving tool in the spindle is really easy. The cutter with cutter knob has to be screwed counterclockwise into the spindle. Screw and tighten the cutter and its knob by hand, do not use pliers.
In case the cutting depth is not right, you can increase the cutting depth by screwing the depth nose retainer ring up on the spindle, or you can decrease the cutting depth by screwing this graduated ring down.
Installing a scoring tool
 A scoring tool is very similar to an engraving tool. The cutting angle is 45° and the purpose of this tool is to obtain a chamfered edge at your engraved plates. A scoring tool is inserted exactly like a normal engraving tool. To preset it in the tool calibration stand, put a washer with specific thickness, e.g. 0.7 mm under the cutter knob, as in the image above.
Installing a diamond scratch tool
 A diamond scratch tool is inserted in the spindle just like a normal engraving tool. The only difference with a normal engraving tool is that you preset it, just like a scoring tool, with a washer just under the cutter knob. Another difference with a normal engraving tool is that you do not want the spindle to rotate when a diamond tool is being used. You can select the “no rotation” option for the spindle in the virtual pendant’s menu, as shown below.
Continue to depth regulator nose calibration.
Continue to the table of contents.


