
This is an old revision of the document!
Table of Contents
Comment utiliser le nez palpeur
Dans la section précédente, vous avez appris à utiliser l’anneau de réglage de profondeur. Examinez à nouveau attentivement les images suivantes :


Si vous souhaitez graver à l’aide du nez, assurez-vous toujours que l’anneau qui retient le nez se trouve approximativement dans la position indiquée sur l’image ci-dessus à gauche. En même temps, assurez-vous que l’anneau de pression à ressort noir est vissé en position haute, comme indiqué sur l’image de gauche.
Il existe deux manières possibles de travailler avec le nez palpeur de profondeur : en utilisant la fonction “contrôle Auto Z”, qui est de loin la méthode la plus simple et la plus répandue, et la manière manuelle.
Pour basculer entre les deux, vous devez cocher l’option « Surface de la plaque » sur votre télécommande virtuelle, à l’aide du bouton « auto ».
Première méthode: Auto Z
 Avec l’option “Auto Z” active, la broche descendra au premier vecteur du fichier de gravure à une certaine vitesse, que nous appelons “Vitesse recherche surface”, exprimée en mm/sec. Lorsque l’ interrupteur de proximité intégré est engagé, le mouvement vers le bas s’arrête et la broche monte d’une certaine distance. Ce mouvement ascendant est appelé “Z vers le haut après mise de surface”. Nous commencerons par expliquer comment régler ces deux paramètres.
Réglage de la "Vitesse recherche surface" et du "Z vers le haut après mise de surface":
- Cliquez droit sur le “?” dans la barre supérieure de la fenêtre pendante, puis poussez en même temps les touches “Ctrl” et “Shift” et choisissez l’option “préférences”. Dans la fenêtre qui s’ouvre cliquez sur la page « Job ». Dans la section « surfacing » vous pourrez modifier ces deux variables. (voir image ci-dessous).

- Dans la fenêtre de dialogue, accessible via le majuscule et les touches, la page « I/O » vous permet de vérifier si le détecteur de proximité, utilisé pour le contrôle auto Z, fonctionne comme il se doit. Pour ce faire, déplacez la broche vers le bas, à l’aide du bouton, jusqu’à ce que le nez en bas touche presque le matériau de gravure. Appuyez ensuite sur les touches et , cliquez sur l’onglet « I/O » et poussez doucement la broche vers le haut. Au moment où le détecteur de proximité interne est activé, cela sera visible dans la section « entrées ». La LED « Probe » passera du gris au vert, comme le montre l’image ci-dessus.
- To return to the main screen, click on the “save” button. After having done so you might have to re-home the machine.
Engraving
- Now launch your engraving job. At the first cutter down movement, the nosecone will first touch the engraving material, the Z motor still continues rotating, untiltil internally the probe proximity switch is engaged. This tells the controller to stop moving the Z-axis, and to start engraving the vector.
- At the end of the engraved vector, the spindle moves up to the “probe lift” distance and from there on the controller knows which distance the spindle should be moved down at every character or vector to be engraved.
This method has the big advantage that changes in material thickness do not require a different spindle or Z-axis setting. The Z-down moves will always automatically adapt to the material thickness.
Second method
 The second method to work with the depth regulator nose does not involve the use of the Auto Z control mechanism. In this case the “plate surface” box has to highlight the “set” option, as in the image on the left.
If you use this method, make sure that your engraving job contains a depth of at least 1 mm and maximum 2 mm for everything you want to engrave. This is to allow for the spring to do its work and compensate for eventual differences is material thickness.
You proceed as follows:
- Make sure your cutter is set properly and that the cutter tip sticks out a little through the nosecone, enough to give you the desired engraving depth.
- Remove the cutter from the engraving spindle, or unscew it from the spindle so that the cutter tip is no longer lower than the nosecone.
- Use the jog ARROWS
 to position your spindle somewhere above your engraving material.
 - Make sure the black knurled spring pressure ring is screwed in the up position (see the images on top of this page).
- Click the “set material surface” key
 on your keypad. The following window will open :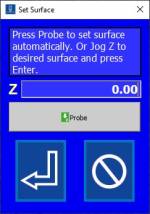
- Click the “Probe” key
 to begin the surfacing routine. Keep pressing this key and the Z-axis will move down slowly until the spindle touches the material. It will then move up above the material surface. Doing this, the machine knows exactly at what level the material surface is. The Z-up and the Z-down distances are executed from that level. The Z-up moves can then be set really tight, just enough to lift the cutter out of the material to move to the next character.
 - Screw the cutter back into the spindle and tighten it by hand.
- You are ready to run your engraving job.


Continue to the use of the spindle pressure spring.
Continue to the table of contents.


