
This is an old revision of the document!
Table of Contents
Option de menu "Plaquettes multiples" (Alt + M )
Le concept des Plaquettes multiples
Très souvent, vous aurez une série de plaquettes ou étiquettes à graver qui partagent des caractéristiques: la couleur de la matière, leur taille (largeur et hauteur), le nombre de lignes de texte et les craactéristiques de chaque ligne (police, hauteur de caractère, etc.). La procédure “logique” serait de précouper la matière à graver sur le format de ces plaquettes ou étiquettes individuelles et de graver ensuite chaque étiquette individuelle.
Cependant, quand la taille de vos étiquettes individuelles est assez petite pour permettre à la machine d’en graver plusieurs, vous pourriez également créer un seul travail qui contient plusieurs colonnes et/ou rangées d’étiquettes, afin de graver un nombre d’étiquettes en un seul cycle. En plus, vous pouvez les faire découper sur mesure par la machine même.
Pour ce but, nous avons créé une fonction “Plaquettes multiples” dans le logiciel Symmetry, que vous pourriez comparer avec l’impression de feuilles de 2 x 7 ou 3 x 8 étiquettes sur une imprimante, partant d’une feulle de papier format A4.
Exemples
Premier exemple: Si vous disposez d’une machine à graver Cyborg X-300 avec une aire de gravure de 300 x 200 mm et vous devez graver une série de 30 étiquettes de 55 mm de large et 35 mm de haut, vous pourriez créer un seul travail de 25 étiquettes (5 étiquettes en largeur x 5 étiquettes en hauteur) à partir d’une seule plaque à graver.
 Another example: You have a piece of material with a size of (at least) 180 mm x 75 mm and your tags are 90 x 25 mm, you could engrave six tags in one cycle. The example we are showing was made from a material size of 200 x 100 mm.
What is more, you can choose to your tags cut to size by the machine using a specific cutter. The result will be six individual tags with their four sides already beveled.
Operating procedure
Before looking in detail at the Multiplate screen, we will walk you through the basic method how to create Multiplate.
- The first step will be to create (or open) a layout for one individual tag that you would like to create. The easiest way to create a job would be through Autoplate. That way, you will:
- decide the size of your tag
- specify the number of text lines and their respective heights
- choose a font
- add a logo, etc.
- The next step, which will also make it easier to visualise the end result, is to enter your texts. Once this is done, you might want to save the individual tag for later use.
- Once you are completely satisfied with the way your individual tag looks like – you might even want to engrave a sample to show others – you open the Multiplate window and convert your initial job to a Multiplate by entering the size of the material you will use, the margins, the number of plates you want to engrave, and some other options.
- Save your job and start engraving.
Schematically
| Step 1 and 2 | A single layout with text |
|---|---|
 |
|
| Step 3 | The Multiplate window |
 |
Multiplate Window

▪ Material Dimensions
- Material Width
- Material Height
The original height and width shown are taken from the height and width of your original singe plate layout. You will enter the height and width of the piece of material you are going to use.
▪ Material Margins
- Left Margin
- Right Margin
- Top Margin
- Bottom Margin
The standard setting will be 0.00 mm or .0 inches. We advise you to always set a certain margin, for several reasons:
- Most engraving machines are equipped with bumper slabs. In normal circumstances, the bumper slabs will not protrude above the material surface. However, when these slabs stand out above the plate surface and your engraving is done with the aid of the depth regulator nose, the depth regulator nose could hit the bumper slabs when moving too close to the side of the sheet. If that is the case, the Material margin on these sides should be higher than the radius of your depth regulator nose. You should enter a value of at least 8 mm or .2 inches.
- If set correctly, the height of the bumper slabs allows them to stand out above the machine’s table surface, but lower than the material surface. Even if this is the case, it could happen that the wider part of your conical tool would touch the bumper slabs when engraving or “scoring” too closely to that side of the material.
- When setting a 0 mm Material margin where there are no bumper slabs, the Multiplate option will allow your machine to position the score line exactly on the side of the material, or even outside the material, when the actual material dimensions ar slightly smaller than the Material Dimensions entered in Multiplate. As a consequence, only the inner borders of your plates will have a beveled (or slanted) side. The margin will make sure the score line is made properly in the material.
▪ Interplate Margins
- Horizontal
- Vertical
The standard setting is 0.00 mm or .0 inches. If the individual nametags will not be cut on the machine using Score between plates, but with a circular saw, you will want to add an interplate margin wich compensates for the width of your sawblade.
▪ Score Details
- Score Between Plates will prompt the machine to cut a groove between and around the individual plates (or tags) after having engraved the texts and logos.
- Pause before score will prompt the engraving machine to pause after having engraved all texts and logos. It allows the operator to replace the engraving cutter by a scoring cutter, the tip of which has a specific geometry, with a cutting depth preset in such a way that your material will be partially cut through with a V-shaped groove. This allows you to easily separate the individual plates or tags.
The obvious setting would be to choose “Pause”. Whether you need to swap cutters or not, you can restart your machine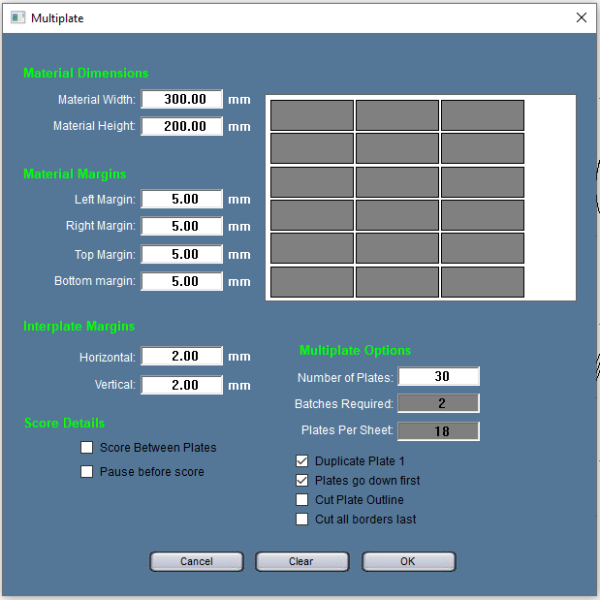 after the pause by lifting the pause through the machine keypad.
▪ Multiplate Options
- Number of plates
- Batches required
- Plates per sheet
The only one of three boxes that can be modified by the operator is the number of plates. Both the other parameters, plates per sheet and batches required (how many sheets you require) will be calculutad based on the size of the dividual plates, the material dimensions and the number of plates you require.
- Duplicate Plate 1: When your first plate you are about to reproduce contains lines filled with text, these texts will be copied onto the corresponding lines of the other plates. The other option is to create a series of blank plates that will have to be filled with text, either by typing the texts or by using the Text Merge Wizard.
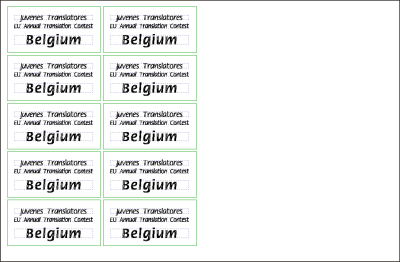
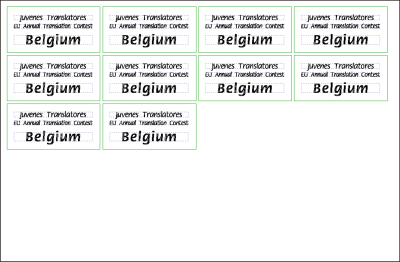
- Plates go down first: When this option is not selected, the plates will be engraved from left to right, then from top to bottom, i.e. row by row. With this option selected, the machine will engrave the plates first from top to bottom, before starting with the next column of plates.
The example below on the left is showing the result when the “Plates go down first” checkbox was checked, the example on the right shows the same Multiplate job, but with “Plates go down first” unchecked.
- Cut Plate Outline
- Cut all borders last


Showcases
- Badges for the Anthromax executive staff
Anthromax’s 30-headed executive staff requires nametags for public appearances and corporate meetings.


